Showing posts with label Blogger Widgets and plugins. Show all posts

Stylized Page Navigation Widget For Blogger|Blogspot blogs – MBT Church Theme Style!


Page-Navigation-Widget-for-BloggerAs mentioned in the download page of MBT Church Themethat it has a Page Navigation Widget that is an alternative to Recent Posts, Home and Older Posts links at the bottom of blogger hosted blogs. In order to add the stylized version of Page Navigation Widget created by Mohammad Rias to your MBT Church Theme, follow the steps below,

Page Navigation Widget For Blogger Hosted Blogs

  1. Log into your blogger account and go to Layout > Page Elements
  2. Then Click on Add a Gadget
  3. Amongst the Blogger Featured Widgets Choose HTML/JavaScript Widgethtml-javascript blogger widget
  4. Inside the HTML/JavaScript Widget  paste the code below,
    <style type="text/CSS">
    .showpageArea a {
    text-decoration:underline;
    }
    .showpageNum a {
    text-decoration:none;
    border: 1px solid #7AA1C3;
    margin:0 3px;
    padding:3px;
    }
    .showpageNum a:hover {
    border: 1px solid #7AA1C3;
    background-color:#F6F6F6;
    }
    .showpagePoint {
    color:#333;
    text-decoration:none;
    border: 1px solid #7AA1C3;
    background: #F6F6F6;
    margin:0 3px;
    padding:3px;
    }
    .showpageOf {
    text-decoration:none;
    padding:3px;
    margin: 0 3px 0 0;
    }
    .showpage a {
    text-decoration:none;
    border: 1px solid #7AA1C3;
    padding:3px;
    }
    .showpage a:hover {
    text-decoration:none;
    }
    .showpageNum a:link,.showpage a:link {
    text-decoration:none;
    color:#7AA1C3;
    }
    </style>
    <script type="text/JavaScript">
    function showpageCount(json) {
    var thisUrl = location.href;
    var htmlMap = new Array();
    var isFirstPage = thisUrl.substring(thisUrl.length-5,thisUrl.length)==".com/";
    var isLablePage = thisUrl.indexOf("/search/label/")!=-1;
    var isPage = thisUrl.indexOf("/search?updated")!=-1;
    var thisLable = isLablePage ? thisUrl.substr(thisUrl.indexOf("/search/label/")+14,thisUrl.length) : "";
    thisLable = thisLable.indexOf("?")!=-1 ? thisLable.substr(0,thisLable.indexOf("?")) : thisLable;
    var thisNum = 1;
    var postNum=1;
    var itemCount = 0;
    var fFlag = 0;
    var eFlag = 0;
    var html= '';
    var upPageHtml ='';
    var downPageHtml ='';
    var pageCount = 2;
    var displayPageNum = 5;
    var upPageWord = 'Previous';
    var downPageWord = 'Next';
    var labelHtml = '<span class="showpageNum"><a href="/search/label/'+thisLable+'?&max-results='+pageCount+'">';
    for(var i=0, post; post = json.feed.entry[i]; i++) {
    var timestamp = post.published.$t.substr(0,10);
    var title = post.title.$t;
    if(isLablePage){
    if(title!=''){
    if(post.category){
    for(var c=0, post_category; post_category = post.category[c]; c++) {
    if(encodeURIComponent(post_category.term)==thisLable){
    if(itemCount==0 || (itemCount % pageCount ==(pageCount-1))){
    if(thisUrl.indexOf(timestamp)!=-1 ){
    thisNum = postNum;
    }
    postNum++;
    htmlMap[htmlMap.length] = '/search/label/'+thisLable+'?updated-max='+timestamp+'T00%3A00%3A00%2B08%3A00&max-results='+pageCount;
    }
    }
    }
    }//end if(post.category){
    itemCount++;
    }
    }else{
    if(title!=''){
    if(itemCount==0 || (itemCount % pageCount ==(pageCount-1))){
    if(thisUrl.indexOf(timestamp)!=-1 ){
    thisNum = postNum;
    }
    if(title!='') postNum++;
    htmlMap[htmlMap.length] = '/search?updated-max='+timestamp+'T00%3A00%3A00%2B08%3A00&max-results='+pageCount;
    }
    }
    itemCount++;
    }
    }
    for(var p =0;p< htmlMap.length;p++){
    if(p>=(thisNum-displayPageNum-1) && p<(thisNum+displayPageNum)){
    if(fFlag ==0 && p == thisNum-2){
    if(thisNum==2){
    if(isLablePage){
    upPageHtml = labelHtml + upPageWord +'</a></span>';
    }else{
    upPageHtml = '<span class="showpage"><a href="/">'+ upPageWord +'</a></span>';
    }
    }else{
    upPageHtml = '<span class="showpage"><a href="'+htmlMap[p]+'">'+ upPageWord +'</a></span>';
    }
    fFlag++;
    }
    if(p==(thisNum-1)){
    html += '<span class="showpagePoint">'+thisNum+'</span>';
    }else{
    if(p==0){
    if(isLablePage){
    html = labelHtml+'1</a></span>';
    }else{
    html += '<span class="showpageNum"><a href="/">1</a></span>';
    }
    }else{
    html += '<span class="showpageNum"><a href="'+htmlMap[p]+'">'+ (p+1) +'</a></span>';
    }
    }
    if(eFlag ==0 && p == thisNum){
    downPageHtml = '<span class="showpage"> <a href="'+htmlMap[p]+'">'+ downPageWord +'</a></span>';
    eFlag++;
    }
    }//end if(p>=(thisNum-displayPageNum-1) && p<(thisNum+displayPageNum)){
    }//end for(var p =0;p< htmlMap.length;p++){
    if(thisNum>1){
    if(!isLablePage){
    html = ''+upPageHtml+' '+html +' ';
    }else{
    html = ''+upPageHtml+' '+html +' ';
    }
    }
    html = '<div class="showpageArea"><span style="COLOR: #000;" class="showpageOf"> Pages ('+(postNum-1)+')</span>'+html;
    if(thisNum<(postNum-1)){
    html += downPageHtml;
    }
    if(postNum==1) postNum++;
    html += '</div>';
    if(isPage || isFirstPage || isLablePage){
    var pageArea = document.getElementsByName("pageArea");
    var blogPager = document.getElementById("blog-pager");
    if(postNum <= 2){
    html ='';
    }
    for(var p =0;p< pageArea.length;p++){
    pageArea[p].innerHTML = html;
    }
    if(pageArea&&pageArea.length>0){
    html ='';
    }
    if(blogPager){
    blogPager.innerHTML = html;
    }
    }
    }
    </script>
    <script src="/feeds/posts/summary?alt=json-in-script&callback=showpageCount&max-results=99999" ; type="text/javascript"></script>
  5. If you are using a domain other than .blogspot.com or .com, then kindly change  the bolded red text .com with your domain extension. For Example if your domain ends with .info or .biz than replace .com with .info or .biz . But if you are a BlogSpot user than leave the code unchanged.
  6. Once you have pasted the code inside the widget, simply drag your HTML/Javascript widget to the area just below your posts and drop it there, as shown in the picture below,
Page-Navigation-Widget-For- blogspot blogs


That’s All!
Hope you enjoyed it. Let me know if anything is unclear.

Multi Tab Widget For Blogger/Blogspot Blogs -Updated


Update: A more cuter and improved widget can be found here -> Advanced Multi Tabbed Widget


multi-tab-widget-for-blogge
Multi tab Widget is a must widget for every blog may that be wordpress hosted blog or Blogspot/Blogger. It helps to decrease the load time of a blog by combining three or more than three widgets into one! .You might have seen this widget on every blog and even on my blog (look at the sidebar) but the question is how do you add it? Well If you go and search in Google on how to add a multi tab widget to your blog you will land on various blogs with several tutorials but believe it or not, disappointment is what you will get in return. Now why is that?

This widget looks cool only if coded with CSS and JavaScript. Several blogs share different tutorials but unfortunately most of these tutorials are either very difficult to understand or they are written in a technical language that a newbie can’t understand. Moreover the codes that they offer are pretty lengthy which increase the load time of your homepage and often the widget doesn’t seem to work in browsers like Internet Explorer. And the worst part is that some bloggers who share this trick often add their blog link to the widget code and when you view that widget in your blog, at the bottom of that widget you will find this “Widget by XYZ.com” or “Grab This Widget”. This link is surely injustice with the reader. In short give preference to anything which is easy to understand, interesting and which may give a professional look to your blog not a Grab this widget look.
Now how come my widget be very different. As I have mentioned in my About Me page that I am not an HTML or JavaScript expert but I have learnt the art of editing my template through trial and error. I read blogs day and night and when some blog catch my attention I start playing with its template via its Source File, which shows all their template coding in HTML, XML and CSS Language. Hence I have stolen many hidden and secret codes :D and thus I am ready to share those codes with you. Don’t worry I will never add a Grab this widget  link to any widget that I share.
UPDATE:-
Most of you complained that the tabs are not working/clickable. I was amazed too because this widget was working perfectly alright in all my test blogs. Then how come its not working in your blogs? Well the answer was simple than I could imagine.
This widget uses a JavaScript which is responsible for making the tabs clickable. I saved this widget in Google sites and link it to this widget. This was the mistake that I commit. Google sites offers limited bandwidth and is far slow to respond than you can imagine. Hence when you guys would add this widget to your blog, the JavaScript would not load, as a result leading to static tabs.
Fortunately I have updated this post with all necessary steps to take. You will have to add the JavaScript directly to your blogger templates. Doing this will improve the widget performance and will also reduce your page load time. This update will solve all your problems!
Follow the Steps Below,
  • Go To Blogger > Layout > Edit HTML
  • Search for  </head>              (Tip: Use Browser Search Box. Press Ctrl + F )
  • And Just above </head> paste the code below,
<script type='text/javascript'>
//<![CDATA[
function tabtampil_oom(TPID, id)
{
  var Tabtampil = document.getElementById(TPID);
  var TTs = Tabtampil.firstChild;
  while (TTs.className != "TTs" ) TTs = TTs.nextSibling;
  var TT = TTs.firstChild;
  var i   = 0;
  do
  {
    if (TT.tagName == "A")
    {
      i++;
      TT.href      = "javascript:tabtampil_ubah('"+TPID+"', "+i+");";
      TT.className = (i == id) ? "Active" : "";
      TT.blur();
    }
  }
  while (TT = TT.nextSibling);
  var Halamans = Tabtampil.firstChild;
  while (Halamans.className != 'Halamans') Halamans = Halamans.nextSibling;
  var Halaman = Halamans.firstChild;
  var i    = 0;
  do
  {
    if (Halaman.className == 'Halaman')
    {
      i++;
      if (Halamans.offsetHeight) Halaman.style.height = (Halamans.offsetHeight-2)+"px";
      Halaman.style.overflow = "auto";
      Halaman.style.display  = (i == id) ? 'block' : 'none';
    }
  }
  while (Halaman = Halaman.nextSibling);
}
function tabtampil_ubah(TPID, id) { tabtampil_oom(TPID, id);
}
function tabtampil_inisial(TPID) { tabtampil_oom(TPID,  1);
document.write('');}
//]]>
</script>
  • Save your template

Adding the code for  Multi Tab widget to HTML/JavaScript widget

The Code for Our Multi Tab Widget looks like this,
<style type="text/css">
div.TabTampil div.TTs
{height: 24px; overflow: hidden; }
div.TabTampil div.TTs a:hover, div.TabTampil div.TTs a.Active
{ background-color: #eee; }
div.TabTampil div.Halamans
{ clear: both; border: 1px solid #fff; overflow: hidden; background-color:#ffffff;}
div.TabTampil div.Halamans div.Halaman
{ height: 100%; padding: 0px; overflow: hidden; }
div.TabTampil div.Halamans div.Halaman div.Alas
{ padding: 3px 5px; }
div.TabTampil div.TTs a
{ border-left:1px solid #eee; border-right:1px solid #eee; border-top:1px solid#eee; border-bottom:0px solid #eee; float: left;
display: block; width: 95px; text-align: center; vertical-align: middle; height: 24px; padding-top: 3px; text-decoration: none; font-family: "Arial", Serif;
font-size: 11px; font-weight: 900; color: #000000}
</style>
<form action="tabtampil.html" method="get">
<div id="TabTampil" class="TabTampil">
<div style="width: 300px;" class="TTs"> <a>Tab 1</a> <a>Tab 2</a> <a>Tab 3</a></div>
<div style="width: 300px; height: 300px;" class="Halamans">
<div class="Halaman">
<div class="Alas">
<br/> 
Tab 1 content goes here
</div>
</div>
<div class="Halaman">
<div class="Alas">
<br/>

Tab 2 content goes here

</div>
</div>
<div class="Halaman">
<div class="Alas">
<br/>

Tab 3 content goes here
</div>
</div>
</div>
</div>
</div></form>
<script type="text/javascript">tabtampil_inisial('TabTampil');</script>
Things To Note:
#eee : This is the background colour of the Tabs. The Default one is grey. If you want to change it to a different colour of your choice then use MBT Embeddable Colour Chart
#fff :  This is the colour of the border of your multi tab widget. The default one is white you can customize it to a colour of your choice using the same colour chart mentioned above.
#ffffff : This is the background colour of the main body of your widget. This is where you will add content to the widget. The default one is white. Use MBT Colour Chart if you wish to use a different colour.
#eee : This is the colour of the borders around those rectangular tabs. The default one is grey. Use MBT Colour Chart if you wish to use a different colour.
#000000 : This is the colour of the text/font that you will write to name your tabs. In other words, it’s the colour of your tab titles. The default one is black.
Replace these with your tab titles
Tab 1 , Tab 2  , Tab 3
Replace these with your widget codes.
Tab 1 content goes here , Tab 2 content goes here ,  Tab 3 content goes here
Here goes the codes of your content/widgets, which can be your recent comments widget, recent posts widget, any written text, a picture etc. For example, to add a recent comments widget to the first tab, name Tab 1 as Comments and replace Tab 1 content goes here with the HTML code of your recent comments widget.
Adding the Multi Tab Widget To your Blog
After you have customized the code, do the following,
  • Log into your blogger account
  • Go to Layout > Page Elements
Blogger Layout Page Elements
  •  Click on Add a Gadget
add-a-gadget
  • Then Choose HTML/JavaScript Widget from the widget list that blogger provides
htmljavascript widget blogger
Now paste your customized code into this widget by leaving the title empty. Hit Save and You are Done! Check your blog to see the new dress :)
That’s All!
Feel free to ask or suggest. Your questions and suggestions are the only favour I get in return.

125 by 125 Ad Banner Widget For Blogger/Blogspot Blogs


125-by-125-Ad-Banner-Widget

Early this morning I tried to create some tables using simple HTML. Remarkably I arrived at a really easy and well optimized code that could be used to show your 125 by 125 Ad banners just like the one on my sidebar. This widget is named “125 by 125 Ad Banner Widget”
See an example below,


 125 by 125 Ad Banners Widget  (1)
AD DESCRIPTIONAD DESCRIPTION
Here is the code to be pasted in your HTML/JavaScript Widget,
<div align="center">
<table border="0"  cellpadding="2" cellspacing="6" width="265"bgcolor="#ffffff">
<tbody><tr>
<td><center><a href="URL OF ADVERTISER" rel="nofollow"><img border="0" alt="AD DESCRIPTION" width="125" src="URL OF BANNER’S IMAGE" height="125"/></a></center></td>
</tr>
<tr>
<td><center><a href="URL OF ADVERTISER" rel="nofollow"><img border="0" alt="AD DESCRIPTION" width="125" src="URL OF BANNER’S IMAGE" height="125"/></a></center></td>
</tr>
</tbody></table>
<table border="0" bordercolor="#0084ce" cellpadding="2" cellspacing="6" width="265" bgcolor="#ffffff">
<tbody>
      <tr>
       <td><center><a href="URL OF ADVERTISER" rel="nofollow"><img width="265" height="37" border="0" alt="Advertise Now!" src="URL OF BANNER’S IMAGE" /></a></center></td>
      </tr>

    </tbody></table>
</div>

Now make the following changes,
1.  Replace URL OF ADVERTISER with the website link of the advertiser
2.  Replace URL OF BANNER’S IMAGE with the Image link of the Advertiser’s banner
3.  Replace AD DESCRIPTION with some information related to the Ad. The description appears when some hovers his mouse cursor over the banner.
4.  If you want to increase the distance between the ad blocks then adjust width="265" . By default 265 is the minimum width of this banner widget. You can’t further decrease the width.

  • If you want to increase the number of rows of this ad widget and want to add two other Ad blocks i.e 6 ad blocks. Then simply copy paste the code below just above</tbody></table>
<tr>
<td><center><a href="URL OF ADVERTISER" rel="nofollow"><img border="0" alt="AD DESCRIPTION" width="125" src="URL OF BANNER’S IMAGE" height="125"/></a></center></td>
</tr>


  • If you want to have a more fancy Ad widget like the one below,
125 by 125 Ad Banners Widget  (2)
BEST---2
34
 
ADVERTISE
then copy and paste the code below in your HTML/Javascript Widget
<div align="center">
<table border="0"  cellpadding="2" cellspacing="6" width="265"bgcolor="#ffffff">
<tbody><tr>
<td><center><a href="URL OF ADVERTISER" rel="nofollow"><img border="0" alt="AD DESCRIPTION" width="125" src="URL OF BANNER’S IMAGE" height="125"/></a></center></td>
</tr>
<tr>
<td><center><a href="URL OF ADVERTISER" rel="nofollow"><img border="0" alt="AD DESCRIPTION" width="125" src="URL OF BANNER’S IMAGE" height="125"/></a></center></td>
</tr>
</tbody></table>
<table border="0" bordercolor="#0084ce" cellpadding="2" cellspacing="6" width="265" bgcolor="#ffffff">
<tbody>
      <tr>
       <td><center><a href="URL OF ADVERTISER" rel="nofollow"><img width="265" height="37" border="0" alt="Advertise Now!" src="URL OF BANNER’S IMAGE" /></a></center></td>
      </tr>

    </tbody></table>
</div>

Follow the same steps as instructed above to customize this new code.
If you are searching for some Ad Banner Images than may be you will like the Animated 125 by 125 AD Banners
I hope you will surely like this widget. The internet is full of tutorials for such a widget but most of them use complex CSS and ask you to edit your blogger template but this one is using simple HTML and is a copy-paste widget code. Kindly let us know how you find it.

Learn How To Show Post Summary using The “Read More Link” or “Continue Reading link”


Totally Exceptional!!A good blogger can be identified by the way he manages his blog and organizes his posts. The homepage is the most important part of every blog. The homepage must contain up to 5-6 posts in order to seize the attraction of reader as much as possible. Keeping a reader busy for a longer time is what I call a blogging success. Showing 5-6 posts is load-time and user friendly only if you show a summary of each post. On my homepage you must have seen a Read MoreLink, clicking which expands the entire post. Look at a screen shot Below,
read-more1
This link just adds beauty to your blog along with some pro spice to it. So lets learn how to summarize your posts and give them the expandable functionality.

The steps that must be followed for planting this TNT are,
  • Go to layout > Edit HTML
layout-edit-html

Now The Most Important Step –> Back Up Your Template
By backing up your template I mean that you must save a copy of your current template in your computer hard drive. If in case something goes wrong, you can restore your template and have everything working as normal as before.
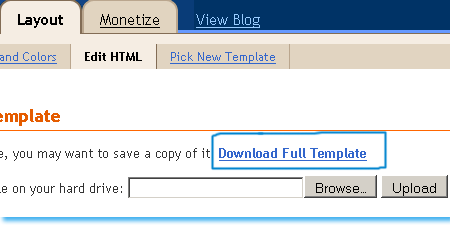
To backup your template click on the link saying Download Full Template , as shown below
backup-template
If suppose something goes wrong , you will simply click the Browse button, locate your saved template and then simply click the Upload button to restore your template back to normal.
  • Click on "Expand Widget Templates" at the top right hand corner of your Edit HTML page
expand-widgets
  • Now find this code ]]></b:skin> 
Tip: Pressing Ctrl + F  and then paste this code into the search box, as shown below,
Search-code
The search box is an easy way of finding codes in your template.
  • Just after ]]></b:skin> copy paste the code below,
Tip: Highlight the code below and then press Ctrl + c to copy the entire code and then pressCtrl + v to paste the code
<style>
<b:if cond='data:blog.pageType == "item"'>
span.fullpost {display:inline;}
<b:else/>
span.fullpost {display:none;}
</b:if>
</style>


  • Now find this code  <data:post.body/>
And just after <data:post.body/> add the code below,
<!--READ-MORE-STARTS-->
<b:if cond='data:blog.pageType != "item"'>
<a expr:href='data:post.url'>
<div style="text-align: right;">Read More ->></div></a>
</b:if>
<!--READ-MORE-STOPS-->

You can replace the text in red with anything you like, e.g: Continue Reading, Keep Reading
If you want to shift the "Read More->>" text to the extreme-left side, use this code:
<!--READ-MORE-STARTS-->
<b:if cond='data:blog.pageType != "item"'>
<a expr:href='data:post.url'>
<div style="text-align: left;">Read More ->></div></a>
</b:if>
<!--READ-MORE-STOPS-->

  • Save your template and you are Done!

Read Further to know How to Apply this TNT in your Posts
Now whenever you want to write a post in windows Live Writer, follow the procedure below,
  • Once you had finished writing your post, as shown below,
Readmore1
  • Just after completing your post click on the source button at the bottom of your windows live writer page,
readmore2
You will see something like this,
 source code for your post
  • Now use the code below to hide the portion of your post that you don’t want to be shown on your homepage
<span class="fullpost">
</span>
Now suppose if you want to show the post only till the lines
I have explained everything in these images so read carefully!
So you will add the codes as shown below,
the highlighted source code refers to the hidden text
You can see in the image above that I have added <span class="fullpost"> just above the part of the post I wanted to hide. The text that I want to hide is the one below,
“Please use windows live writer only for writing quality posts. This TNT of Read More link works best with windows Live writer. Blogger Editor is simply annoying and this trick simply just don’t work efficiently with it. If you still want to use blogger editor rather than windows live writer than frustration is what you will encounter! “
I added </span> to the part where the entire post completes or source code ends

In short add <span class="fullpost"> just before the text to be hidden and add </span>just after it
That’s All!
You can use some of the Images below instead of that Read More –>> text
 read-more with a black outline simple readmore text image read-more with a blue drop shadow read more text with black drop shadowread-more black and orange
To add an image instead of text simply replace Read More ->> in the code above with this,
<img src=”URL Of Your Image”/>
Replace URL Of Your Image with your image link.

Update:-
I have created some high quality Read More Buttons, may be you will like them more. Visit these links,
If you want to learn how to add  these images instead of that Read More->> text, then let me know so that I could write a new post on that. And believe me adding an image instead of a text is extremely easy.

powered by Blogger | WordPress by Newwpthemes | Converted by BloggerTheme